
Products recommended in this post contain affiliate links. If you buy something through our posts, we may receive a commission at no extra charge to you. See our full disclosures here.
Building your pond can be one of the most exciting times in your life.
However, making sure you’re doing it right, setting it up properly, and that you’re going to end up with the dream you had in your mind is where problems start.
Choosing the right pond liner can help eliminate these frustrations, reduce your maintenance, and let you spend more time enjoying your aquascape.
Top 5 Best Pond Liners Available
Finding the best pond liner can be confusing unless you know precisely what you’re looking to achieve.
To help you save time, money, and the frustration of weeding through the different liners available, we’ve found 5 of the best and listed them below.

 Check Offer Prices [Amazon]


1. Firestone 45 millimeter EPDM Rubber Pond Liner - Top Quality Pond Liner
 Check Offer Prices
Highlights
The Firestone EPDM 45mm Pond Liner is the best budget pond liner we’ve found.
EPDM is incredibly durable, and the Firestone liner arrives precut so you can easily mold it to your existing basin. The liner works well with ponds, fountains, gardens, and a wide variety of other applications.
Each Firestone liner is built from the highest-quality materials so even though it is slightly more expensive than others we’ll feature, the quality you’re getting still makes it a budget liner.
If your pond is oddly shaped, the Firestone liner is easy to mold into corners and crevices without dealing with wrinkles and creases. The dark color on the liner helps it resist UV fading and makes your shallow pond appear significantly deeper.
Pro Tip
Pros
- Perfect for abnormally-shaped ponds and water gardens.
- The UV-resistant design also helps resist tears and punctures.
- EPDM material works great in colder climates with harsh winters.
- The dark color helps your pond appear deeper than it is.
- Each EPDM liner is fish and plant-friendly.
Cons
- The 15-foot by 20-foot size may not work well for larger ponds.
 Read What Other Owners Say
2. Firestone EPDM Pre-Cut Rubber Pond Liner - Environment Friendly
Highlights
If you’re looking for the best pond liner for koi ponds, the Firestone EPDM Pre-Cut Rubber Pond Liner is a great choice.
This liner, specifically the Firestone W56PL452020, is safe to use in your flora and fauna ponds since it doesn’t contain chemicals that typically cause harm.
The liner features an incredibly flexible rubber membrane to make it easier to mold to your pond’s exact shape.
Pro Tip
Pros
- The liner is lightweight and incredibly flexible.
- it can be sued in a wide variety of garden pond shapes.
- The folds help you mold it into corners and round edges in your pond.
- the liner is versatile and resistant to UV-deteriorate, punctures, and abrasions.
Cons
- The liner is thicker than many other liners we have seen.
Highlights
When it comes to colored pond liners, TotalPond Pond Skins are among some of the best available. They are PVC liners that have been engineered to weigh up to 30 percent less than many EPDM liners.
This lighter weight makes it easier to mold them around your pond while also increasing the flexibility. The liners make an excellent choice for ponds up to 1,000 gallons in size.
Each Pond Skin is woven polyester, making it UV resistant, and the surface helps facilitate the growth of healthy microbes that your plants and fish need to thrive. These microbes help balance the lifecycle of your aquatic garden.Pro Tip
Pros
- The PVC liners are incredibly flexible, durable, and lightweight.
- Pond Skins weigh up to 30 percent less than other PVC liners.
- The woven polyester is UV resistant and helps healthy microbes grow.
- The liners are designed for ponds up to 1,000 gallons in size.
- They are easy to work with and manipulate around corners.
Cons
- The woven polyester means there isn’t a shiny side to the liner.
- It’s possible to install the liner backward; pay attention!
4. beckett Corporation 35-Gallon Preformed Pond Liner - Perfect Pond For Small Space
Highlights
If you are new to pond building or keeping an aquatic garden and want to make your life as easy as possible, the Beckett Corporation 35-Gallon Preformed Pond Liner is a great choice.
It is constructed of hard plastic, making it both durable and sturdy in even the harshest conditions. These pre-formed liners resist punctures and abrasions better than most PVC and EPDM liners.
The bottom of the liner is flat-based with multiple rounded contours to help give your garden a bit of flair. They work great for both above ground and inground ponds, too.
If you want to get up and running as quickly as possible, a pre-formed liner is the best approach to take.
Pro Tip
Pros
- Pre-formed, so you don’t have to deal with creasing or installation.
- The plastic is lightweight and durable, resisting punctures and abrasions.
- The plastic liners are great for both fish and plants, leeching zero toxic chemicals.
Cons
- They are a barebones basic design that isn’t good for original pond building.
5. aquanique Pond Skin 13ft x 20ft Liner - strong pond liner
Highlights
The Aquanique Pond Skin pond liner is unique because, while it is constructed of PVC, it is thinner and more lightweight than most other PVC and EPDM liners.
This lighter weight makes it more flexible, so if your pond has a large number of contours or depth and elevation changes, you’ll have a hard time finding a better liner.
The design of the Aquanique features a unique mesh that helps resist punctures and abrasions while facilitating the growth of healthy microbes.
The only downside to this mesh is that you’ll need to pay attention when algae begin to bloom because it can attach to the mesh and get out of control if you don’t.
Customers have reported that their fish take a preference for this type of liner, making it one of the best pond liners for koi ponds, as well.Pro Tip
Pros
- The Aquanique Pond Skins are perfect for fish ponds.
- The mesh design supports healthy microbe growth to support fauna and flora.
- The liner is incredibly lightweight and highly-flexible, making it easy to install.
Cons
- The Aquanique is thinner than other liners but is still quality for the price.
Necessary Steps To Install Your New Pond Liner
Properly installing your new pond filter is critical to extending its lifespan.
If you rush through the process or miss a step, you could be risking the liner’s health. This can create a situation where you’re forced to pull the liner and re-install it again.
Or, worse, you could end up buying a new liner altogether and repeating the process.
Follow the steps below to make sure your liner is installed correctly, and you’re getting years of use out of it instead of always dealing with leaks, tears, and other problems.
Step 1. Do your research first
Before you start digging, you need to make sure you’re not going to encounter any obstacles.
Buried cables, pipes, and other lines can create massive disasters if you aren’t careful around them. To avoid these obstacles, you will need to call your local agencies.
These agencies can help you determine where buried cables, pipes, lines, and other obstructions are located on your property. They can also help you determine the best location to install your new pond on your land.
Many locales have rules and regulations determining where you’re able to install an aquascape, how deep your pond can be, and the types of features you can use. It’s best to clear these hurdles before you start digging to make sure they don’t come back to bite you later.
It’s also worth noting that picking a relatively shady location will help you in the long run.
Shady locations help keep your fish cool during the warmer months and can help prevent many of the issues pond owners face, like algae blooms.
Step 2. Gather your equipment
Preparing ahead of time is the best way to avoid getting too far ahead of yourself.
Digging a pond or water feature is incredibly intense work. It’s work that is best left to the use of power tools if you can use them.
Before you start digging, spend time thinking about what all you’re going to need.
If your aquascape is on the larger end of the spectrum, you may want to consider renting a Bobcat or front loader to help remove the dirt. For smaller ponds, most hand tools can help you get through the process easy enough.
For most ponds, you’re going to need a shovel, a spade, ropes, and a level to ensure the ground is even where you’re working. A tape measure can help you determine the proper depth.
Step 3. Level the ground around your pond
When it comes to choosing your location, once you have determined where buried hazards are located, you want to select a relatively level spot.
Installing your pond on level ground will help you keep it free of dirt and debris. As rain runs off, it will drag this dirt and debris into your pond, potentially clogging your pump.
If the ground around your area isn’t level, you can level it out and put bricks or concrete slabs down to help prevent runoff from getting into the water.
Step 4. Pull out your detailed plans
The best ponds are always going to start as an idea that ends up being put onto paper.
Having a design in mind before you start will dramatically reduce your frustrations once you begin digging.
You want to think about the overall size, the shape you want, and how deep your pond is going to be. Your depth doesn’t have to stay the same across the entire basin, either.
Some areas of your pond might be deeper than others so you’ll want to think about this aspect while you are considering a pond liner.
Then, consider the exterior and border of your pond. Are you going to be installing plant shelves, rocks, or other features? Make sure you’re accounting for them in your design before you start digging.
Step 5. Start digging
The most crucial step of all is to start digging.
Before you start, though, use a can of spray paint to mark out the shape that you want. Then, as you’re digging, use your tape measure to ensure you are getting to the proper depth in each area.
Make sure that you are accounting for the thickness of your liner, the amount of sand you’ll use as the foundation, and that you aren’t going to be encountering obstacles like pipes and buried electrical wires that could cause injury or more expenses.
Take your time instead of rushing through this part of the process. Rushing will only cause you more headaches when you’re ready to install your liner.
Step 6. Remove potential hazards
The sensitive materials that pond liners are created from make them susceptible to potential hazards that you may not see right away.
For instance, buried rocks, sharp twigs, sticks, and roots, and other obstacles that aren’t completely visible could poke through the liner once you begin adding water to it.
This added weight forces your liner deeper into the soil where you could have missed the hazards if you weren’t keeping a close eye out for them.
You can use a rake to go through the entire hole and uncover the obstacles. If the rake gets stuck or lodged on something, use a smaller shovel or spade to dig out the hazards.
Step 7. Create a sand foundation
Once you have made sure there are no objects left in the dirt that could potentially harm your liner; the next step is to install your foundation.
Sand is one of the best materials to use because it helps water drain through and doesn’t displace like dirt will. Sand also makes it easy to get the perfect shape for your liner to sit on.
For most ponds, you will want to use a layer of sand that is two to three inches thick. This gives you plenty of foundation to avoid having roots grow through or damage your liner on hazards you didn’t see while you were digging.
If you do not want to lay sand down, you can also install a pond underlayment system that will get you the same results. In general, though, sand is cheaper than an underlayment and more comfortable to mold to your specific shape.
When you have molded the sand to the shape of your pond, you will want to use a hose with a light spray head to help compact the sand. Compacting it keeps it from moving and shifting once you begin installing the pond or you get your first rain.
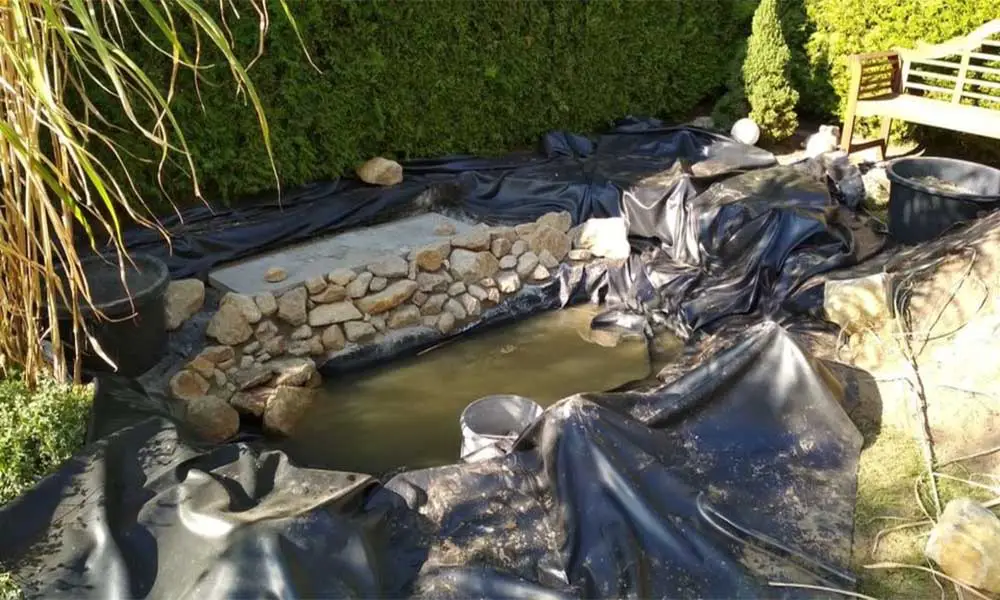
Step 8. Place your liner
Now comes the fun part, installing your liner!
Installing the liner is going to be one of the most tedious parts of the process. Installing the liner requires extra attention to detail and making sure you aren’t damaging it while you’re laying it.
Using rocks to help hold the liner down while you’re installing it can save you a ton of time.
If you are planning on installing a water feature after it is installed, you want to make sure you are laying the liner in a way that supports the function.
You want to have all of your features in place before you proceed to the next step.
Step 9. Slowly start filling the pond
Filling your pond is another step that will take your time and attention.
You don’t want to put the hose in and walk away. This will cause issues for you when you come back, and those issues are more comfortable to address while you’re filling instead of after.
While you’re filling, pay attention to high and low spots. This is the time you’re going to want to even out your liner. As water rests on top of it, you can smooth out the liner and guarantee it stays in place.
Getting wrinkles out of the liner while you’re filling is always easier than waiting until after.
If you need to reposition the liner at all, this is the time to do it. Waiting until after you have water in the pond can make it incredibly challenging to adjust.
Step 10. Install your pond pump
Once you have enough water in your pond to cover the entire pump, you’ll want to place your pump into the lake. Do not plug it in yet.
For now, all you are doing is getting the positioning right.
If you are going to be utilizing solar panels to power the pump, you’ll want to hold off installing them for now. Place them off to the side, out of direct sunlight, while you’re installing the pump.
Grab your hoses and attach them to the pump to ensure you can adequately route them in your setup. If you are using a waterfall or other feature, route your outlet hose to that area.
If you are using a fountain, attach the fountainhead where you want to install it. These are usually included with your pump, so follow the instructions the manufacturer gave you.
Step 11. Add your decorations
As your pond is filling, you will want to begin adding in the decorations that you intend to use.
Adding them in as the water level rises will help keep the water from offsetting them. Install rocks around the outside of your liner to keep it in place as the water level rises.
Once the pond has been filled, you can go back and trim the edges of the liner. This helps ensure that the coating won’t shift or budge as it’s filling and that you don’t cut off too much.
If you trim the liner before the water has filled, you could find that you’ve removed too much. Your underlayment will settle, and your water level will change the positioning of the liner, so it’s always best to wait until the pond is filled.
Step 12. Power up your pump
Once you have finished filling your pond, the next step is to provide power to your pump.
If you are using solar panels, begin installing them in an area where they will get direct sunlight. Move your batteries to another area away from the water.
While you are powering the pump, you want to make sure that you are using a certified GFCI outlet that will trip a breaker if water comes into contact with it.
Not having a GFCI plug or outlet could lead to situations where you may potentially be electrocuted when you touch the water. This is a critical step in staying safe with your pond.
After power has been run to the pump, turn it on and begin to let the water flow. Check for leaks or bad connections. If you notice pipes are leaking, disconnect the power source, remove the tubes from water, and reapply pipe glue.
Give the glue time to dry before turning the pump back on.
Step 13. Complete your aquascape
It’s time to see your hard work come to life.
After you have verified that your pump is operating correctly, there are no leaks and no risks of getting electrocuted, now comes the time when you can start installing your decorations.
Get your pond and water features the way you want them before you start adding plants, fish, and other live creatures.
Giving the water time to settle and get acclimated to your natural environment is critical before you begin adding life to it.
Before you add in fish and plants, you will also want to quarantine them, adding them in slowly to ensure they are not going to pass illnesses or diseases between each other. You also want to make sure they will all play well together.
Once that’s done, sit back and enjoy the fruits of your labor! The hard work is complete!How We Chose The “Best” Pond Liner
Helping you figure out what the best pond liner takes a lot of work, too.
There were quite a few areas we compared to how most people construct their ponds. Different types of ponds require different materials, and each pond builder has a different budget.
This means we had to look at each of the factors that affect your decision and weigh them all out to help come up with the list that we think is the best.
We also looked at reviews from other customers to help make sure you were getting exactly what was advertised. Below are a handful of factors we considered while making our list.
best pond liner materials.
Depending on your specific requirements, one type of pond liner may be better for you than another. Below are three of the most common materials that we recommend for all pond builders and owners.pVC.
LDPE.
EPDM.
PVC, or Polyvinyl Chloride, has been used in building ponds for decades. It’s also one of the most common materials for aboveground pools. The material, itself, is incredibly low-cost meaning you can use it if you are on a tight budget.
In general, PVC liners are thinner than other materials. This means they are lighter and easier to work with when you’re building the pond.
One of the common downsides to a PVC pond liner is that the lifespan is shorter than other materials. That means you’re going to need to spend more time maintaining it.
If you are using a PVC liner, you want to make sure that the one you choose has UV inhibitors.
These inhibitors will help prevent damage from sunlight which can cause the liner to become brittle and form cracks.
Because it is thinner, PVC liners also tend to get punctured more quickly than other materials. You need to take extra care to remove any rocks, debris, or other sharp objects while making sure you keep your pets out of the pond.
LDPE, or low-density polyethylene, is another common material used for pond liners. You’re probably already familiar with it. LDPE is most commonly used for tarps on construction sites.
LDPE liners are incredibly flexible and make it easy for you to conform to specific changes in elevation and contours in your pond. The thickness varies from 20 millimeters thick up to 40 millimeters thick for more durable versions.
One major downside to polyethylene liner is that they are less abrasion and puncture-resistant than even PVC liners. If you have dogs or your ground is loaded with sharp debris, it’s recommended you avoid using LDPE liners.EPDM, or ethylene propylene diene monomer, is a synthetic liner. EPDM is used in everything from roofing materials to door seals. It is manufactured specifically to be used in ponds and stay safe for your fish and plants.
An EPDM pond liner is incredibly abrasion and puncture-resistant because of its design, but this design also means it is more expensive than both LDPE and PVC liners. Most EPDM liners are 45 millimeters thick, making them safe for use around your pets.
It can be more challenging to install and mold to your pond, though. That means you’ll want to leave it in the sunlight to help warm it up and continuously move creases and wrinkles out of it as your pond is filling.
If you have the budget, EPDM is the best material for a pond liner.What’s The Best Pond Liner In 2019
After completing our research and comparing what we’ve found to what other customers are saying, we have found that the Firestone 45mm EPDM Pond Liner is the best that is currently available in 2019.
Top Editor's Choice on Pond Liners
[amazon bestseller="Pond Liners" filterby="price" filter="30" filter_compare="more" filter="available" orderby="percentage_saved" order="desc" template="list" items="10" tracking_id="tnk0c-aawp-cro-b-20"]Subscribe to our Newsletter!
Join our mailing list to receive the latest tips and news of our blog.